ONNX Model format in Flink
Alexey Novakov published on
7 min, 1352 words
Categories: scala
Tags: flink machine learning scala tensorflow onnx
The most popular eco-system to train ML model these days is Python and C/C++ based libraries. An example of model training can be a Logistic Regression algorithms, from ScikitLearn package or more advanced neural networks algorithms offered by Tensorflow, Pytorch and others. There are lots of tools and libraries in Python world to facilitate training and model serving.
In order to bring trained models in Keras or SciKitLean into a Flink application, we can use cross-platform file formats such as ONNX and PMML (in the past). These formats also come with language runtimes. In Flink case, we select JVM SDK to run inference logic inside the Flink job.
Let's look at the example on how to train Logistic Regression in Python using Keras and then use trained model in ONNX format inside Flink.

Training in Python
We will use the same Machine Learning task of Custom Churn Analysis as we did in the first blog post "Machine Learning with Flink".
In order to train Logistic Regression algorithm in Python we will use Keras (part of Tensorflow library) to train simple Artificial Neural Network (ANN) and store it to disk. Then, we will use tf2onnx Python package to convert Tensorflow saved_model to ONNX format.
We have already prepared Git repository to clone and get the trained ONNX model. Follow below instructions:
GitHub Repository: https://github.com/novakov-alexey/tf-onnx-customer-churn
- Clone the Git repository.
git clone https://github.com/novakov-alexey/tf-onnx-customer-churn
- Create Python environment via:
make create-env
- Install Python packages via:
# if you are on MacOs
make install-macos
# or if you are on Linux
make install-linux
- Train and save model to disk via:
python artificial_neural_network.py
- Finally, export into ONNX:
make onnx-export
In result, we get a model in the ONNX format under models/model.onnx file path. We will use it in the next step.
Inference in Flink
Now we are almost ready to use trained model and run inference for the live data. However, there is one caveat in data preparation which we need take care of.
While training ANN in Python we encoded input raw data using SciKitLearn package: categorical features were one-hot encoded, then all columns were scaled as per their mean and standard deviation. This data preparation logic is part of feature engineering and sometimes called as feature extraction. We need either repeat this code in the Flink job or apply it somewhere in upstream data flow before the Flink job gets triggered.
To summarize the whole process we can describe end-to-end flow in the following way:
Training Part:

Figure 1. Model training in Python
Inference Part:
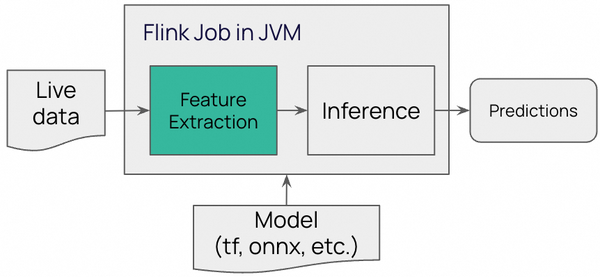
Option 1 - Feature extraction is implemented again:
In Option 1., we use own code inside the Flink job to transform raw data into feature vectors which we can feed directly into the ML model to get predictions.

Figure 2. Data Preparation in Flink job itself
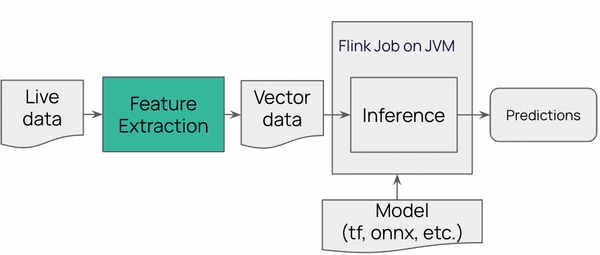
Option 2 - The same Python script acts as pre-processor:
In Option 2. we use the same code which was used during the training process. Python app is running as non-Flink app which prepares and stores data in the vector format.

Figure 3. Data Preparation in Python before the Flink job
As you can see we have to either duplicate feature extraction logic in Flink job (option 1.) or reuse a part of training Python script just to extract features from live data and pass it further to the Flink job.
In this blog post we select Option 1. just demonstrate that standard feature extraction algorithm is not hard to implement in Flink itself. Downside of this option is that we repeat ourselves which makes overall workflow maintenance more labor intensive or even error-prone, if this logic is not synchronized between both phases. If we imagine that this common logic would be stored in different repositories or handled by different development teams, then Option 2. would be preferable.
Job Implementation
Feature Extraction
This part we will implement in Flink ML and reuse some parts of the code from the first blog post about Flink ML.
val schema = Schema
  .newBuilder()
  .column("RowNumber", DataTypes.INT())
  .column("CustomerId", DataTypes.INT())
  .column("Surname", DataTypes.STRING())
  .column("CreditScore", DataTypes.DOUBLE())
  .column("GeographyStr", DataTypes.STRING())
  .column("GenderStr", DataTypes.STRING())
  .column("Age", DataTypes.DOUBLE())
  .column("Tenure", DataTypes.DOUBLE())
  .column("Balance", DataTypes.DOUBLE())
  .column("NumOfProducts", DataTypes.DOUBLE())
  .column("HasCrCard", DataTypes.DOUBLE())
  .column("IsActiveMember", DataTypes.DOUBLE())
  .column("EstimatedSalary", DataTypes.DOUBLE())
  .column("Exited", DataTypes.DOUBLE())
  .build()

// 1 - Index Categorical columns
val indexer = StringIndexer()
  .setStringOrderType(StringIndexerParams.ALPHABET_ASC_ORDER)
  .setInputCols("GeographyStr", "GenderStr")
  .setOutputCols("GeographyInd", "Gender")

// 2 - Encode Geography column
val geographyEncoder =
  OneHotEncoder()
    .setInputCols("GeographyInd")
    .setOutputCols("Geography")
    .setDropLast(false)

// 3 - Merge to Vector
val continuesCols = List(
  "CreditScore",
  "Age",
  "Tenure",
  "Balance",
  "NumOfProducts",
  "EstimatedSalary"
)
val categoricalCols = List("Geography", "Gender", "HasCrCard", "IsActiveMember")
// Geography is 3 countries + other features
val encodedFeatures = List(3)
val vectorSizes =
  encodedFeatures ++ List.fill(
   categoricalCols.length - encodedFeatures.length + continuesCols.length
  )(1)

val assembler = VectorAssembler()
  .setInputCols((categoricalCols ++ continuesCols)*)
  .setOutputCol("combined_features")
  .setInputSizes(vectorSizes.map(Integer.valueOf)*)

// 4 - Normalize numbers
val featuresCol = "features"
val standardScaler = StandardScaler()
  .setWithMean(true)
  .setInputCol("combined_features")
  .setOutputCol(featuresCol)

val trainData = tEnv.from(
  TableDescriptor
    .forConnector("filesystem")
    .schema(schema)
    .option("path", "... path to train data file")
    .option("format", "csv")
    .option("csv.allow-comments", "true")
    .build()
  )

val stages = List[Stage[?]](
  indexer,
  geographyEncoder,
  assembler,
  standardScaler
).asJava

val pipeline = Pipeline(stages)
val featureExtractor = pipeline.fit(trainData)
Above we define a schema of CSV file which will be used to train feature extractors such as encoder and scaler.
This extra-training is going to be done only once on the job start time. For the faster start up we can also save the featureExtractor state
on disk and load it on job start instead of training it every time.
Working with ONNX model
In order to load and call ONNX model in JVM we will use ONNX Runtime library inside our Flink job:
"com.microsoft.onnxruntime" % "onnxruntime" % "1.19.2"
The model inference is wrapped into the Flink RichMapFunction:
case class ChurnPrediction(raw: Float, exited: Boolean)

class CustomerChurnClassifier(modelPath: String, vectorSize: Int)
    extends RichMapFunction[Array[Float], ChurnPrediction]:

  private val shape = Array(1L, vectorSize)
  @transient var env: OrtEnvironment = _
  @transient var session: OrtSession = _

  override def open(parameters: Configuration): Unit =
    env = OrtEnvironment.getEnvironment()
    session = env.createSession(modelPath, OrtSession.SessionOptions())

  override def map(features: Array[Float]): ChurnPrediction =
    var tensor = OnnxTensor.createTensor(env, FloatBuffer.wrap(features), shape)
    val inputs = Map("dense_input" -> tensor).asJava

    val predicted = Using.resource(session.run(inputs)) { outputs =>
      val out = outputs.iterator().asScala.toList.head
      out.getValue.asInstanceOf[OnnxTensor].getFloatBuffer.array()
    }

    ChurnPrediction(predicted.head, predicted.head > 0.5)
MapFunction loads model in memory and creates a session object to be able to run model inference in map method on every input event.
The features parameter represents a feature vector of the source record.
Live Data
As live data we will use just a sample of CSV data taken from the initial CSV file. However, the source type can be in any other form including Kafka, JDBC or other file formats. Inference job also does not care if this job graph will be executed in streaming or batch mode, so we can decide any time whether this job needs to be continuously running or just applied for a prepared data set in batch mode.
val testData = tEnv.from(
  TableDescriptor
    .forConnector("filesystem")
    .schema(
    Schema
      .newBuilder()
      .fromColumns(
        // remove label column
        schema.getColumns().asScala.dropRight(1).asJava
      )
      .build()
    )
    .option("path", testDataPath)
    .option("format", "csv")
    .option("csv.allow-comments", "true")
    // monitor-interval makes CSV source to run in streaming mode
    .option("source.monitor-interval", "3s")
    .build()
)

val transformed = featureExtractor.transform(testData).head
Job Graph Execution
Now we are ready to stitch all pieces together and execute the Flink job graph:
val features = transformed
  .select(
    vectorToArray($(featuresCol))
    .cast(DataTypes.ARRAY(DataTypes.FLOAT()))
  )

def toArray[T: ClassTag](r: Row): Array[T] =
  try r.getFieldAs[Array[?]](0).map(_.asInstanceOf[T])
  catch
    case e =>
      throw RuntimeException(s"Failed to parse field at row(0): $r", e)

DataStream(tEnv.toDataStream(features))
  .map(toArray[Float])
  .map(CustomerChurnClassifier("<path the ONNX file...>", vectorSizes.sum))
  .print()

env.execute("CustomerChurnAnalysis")
Job graph combines together Table API source table and DataStream map functions.
In the first map we cast table row to the appropriate input of the CustomerChurnClassifier. The last one runs the model inference and prints the prediction result into the
console. That row casting is unfortunate price from using Table API and crossing the boundaries to use the DataStream API further. Alternatively we could try
to implement inference logic using Table API as User-Defined-Function (UDF).


Figure 4. Overall Flink job graph

Figure 5. Bottom part of the Flink job graph with focus on inference
Above Flink job graph shows quite a lot tasks. This is because the feature extraction is done with Flink ML which schedules every internal operation as a task.
This is quite useful when we deal with a lot data, so that we can process it very fast. The are 6 tasks running highlighted in the red shape.
They are responsible for the model inference. All other 21 tasks on top are Flink ML tasks are scheduled for training of the feature extraction operators.
These tasks transition to finished state quite fast, as encoders gets trained within 10 seconds based on the training data set of 10k rows we used.
The entire code of the Flink job using ONNX format model is published in Git repository: flink-onnx
Summary
As Flink Developers, we can easily embed ML models into our Flink jobs in format like ONNX. This allows us to train ML algorithms in any language/platform we want, including Python. One important point to think in advance is the feature extraction. Architects should decide how to implement feature extraction logic once and reuse it everywhere: training and inference. Embedding ML models inside the Flink job allows us to avoid any network latency comparing with alternative approach when an ML model is served as a service via HTTP/RPC API.